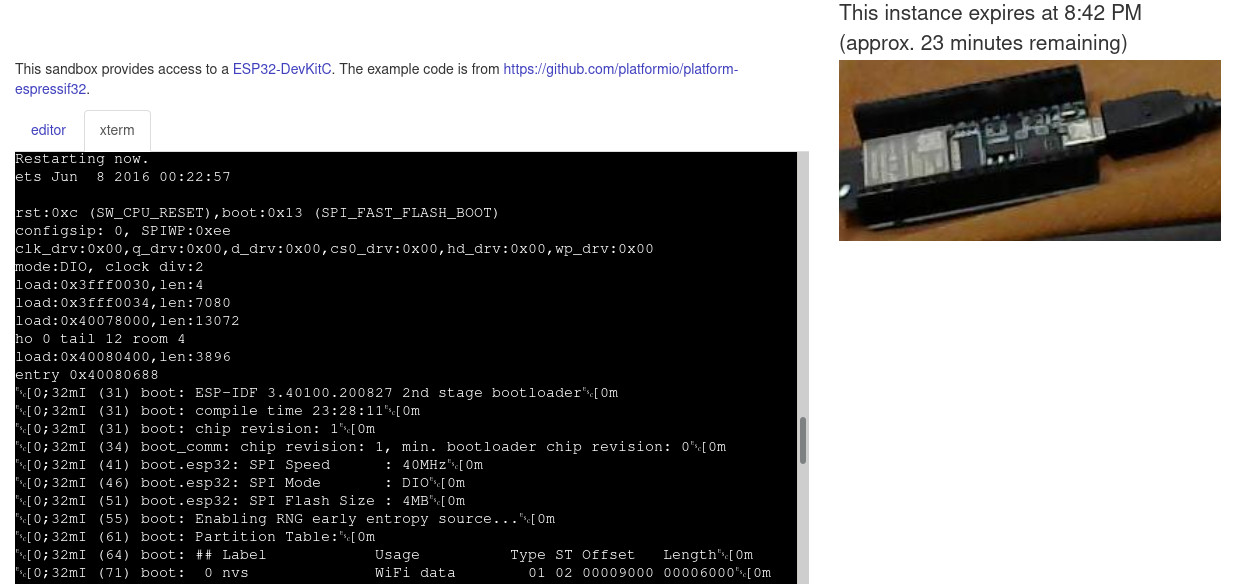
8. Tutorial: ESP32
This tutorial begins where Quickstart ended. Using ESP32-DevKitC as an example, this tutorial provides typical preparation for sharing a PlatformIO-compatible board via hardshare:
pull or create Docker image with required toolchains,
find the device files corresponding to the board interface,
decide how to erase or reset the device after each user,
attach a camera to the workspace,
create a sandbox with example code, as shown in the figure below.
8.1. Prerequisites
Before sharing a device via hardshare, check that you can work with it directly. The main intuition of hardshare is to add reproducibility to a workspace that is already known to be operational. In other words, if you can build code and flash to a device locally using PlatformIO, then you can allow others to do the same remotely.
With this in mind, begin by getting an example from the repository at https://github.com/platformio/platform-espressif32
git clone https://github.com/platformio/platform-espressif32.git
cd platform-espressif32/examples/espidf-hello-world
pio run
pio run -t nobuild -t upload
If an ESP32 board is connected to your host, then this should result in the espidf-hello-world program being written to it. Now, observe messages received via serial from the ESP32:
pio device monitor -b 115200
If you cannot build the example code, if the device cannot be written to, or if nothing is received via serial (indicating the program is not executing or the serial line is broken), then you must debug it before proceeding with this hardshare tutorial.
8.2. Prepare Docker image
In the context of terms from the Introduction, ESP32 is presented as part of a
workspace deployment that you have registered (hardshare register in the
CLI). Each instance that a remote user gets has a corresponding Docker
container. To facilitate efficient reproducibility, we want to prepare a Docker
image that has requirements already installed so the user can simply
“build-and-flash” without having to wait for additional toolchains to be
downloaded, built, etc.
With this in mind, we will begin with a base image that already has PlatformIO installed. Then, we will build example code in a process that will automatically install required packages for that example. Finally, the resulting container will be committed as an image that can be re-used.
The base Docker image is defined by Dockerfile-platformio in the sourcetree of the hardshare client. You can build it yourself from this Dockerfile, or you can pull the image from the registry if there is a tag corresponding to your host architecture. For details about tag names and finding your host architecture, read details about preparing Docker in the Installation Instructions.
Now start a container from it. For example, on a x86_64 host:
docker run -it --rm rerobots/hs-generic-platformio:x86_64-latest bash
This will start the container with a bash shell. PlatformIO is already installed:
# pio --version
PlatformIO, version 5.0.3
In a separate terminal, copy the initial code (including platformio.ini) into
the container. To get the container ID, call docker ps. For the commands
below, we assume this value is 5baec5c80e45. Continuing with the example of
espidf-hello-world from the Prerequisites section above,
cd platform-espressif32/examples
docker cp espidf-hello-world 5baec5c80e45:/root/
Now, in the terminal that is attached to the container:
cd /root/espidf-hello-world
pio run
This will install all requirements for building espidf-hello-world in addition
to actually building espidf-hello-world. Note that multiple, possibly redundant
targets are listed in the example platformio.ini. If you have a ESP32-DevKitC,
then you can delete the sections besides [env] and [env:esp32dev].
Once complete, in a separate terminal,
docker commit -c 'CMD ["/sbin/rerobots-hs-init.sh"]' 5baec5c80e45 hs-esp32-tutorial
To create from this container a new Docker image named hs-esp32-tutorial
(“hs” abbreviates “hardshare”). Once complete, you can stop the container,
either by exiting from the bash shell or by calling docker stop.
Finally, assign this image to be used by hardshare when creating new instances:
hardshare config --assign-image hs-esp32-tutorial
8.4. On security
For the purposes of this tutorial, you can address security by deciding who your remote users will be and what (if anything) is valuable about the host computer. If your users are trusted—for example, they are fellow students who you know from school, or they are collaborators on your engineering team, then you can probably skip this section.
Otherwise, please read the following to provide additional security against adversarial users. The ESP32 board is shared through a Docker container, so there are 3 kinds of attack that are salient:
access to an insecure host on your local network (LAN),
denial-of-service by excessive resource consumption on the host,
exploiting a security bug in the Linux kernel.
A simple solution to prevent access to any hosts on the local network is an
iptables rule that only permits outgoing packets to your router (as part the
packet’s journey to outside networks). To construct this rule, first get a list
of subnets in the routing table:
ip route
There will be a subnet associated with Docker containers, having a network
interface name like docker0. For this tutorial, suppose it is
172.17.0.0/16, i.e., any packet originating from a Docker container has IPv4
address with first two octets 172.17.. There will also be a default route,
where packets are sent when their destination is somewhere in the Internet. For
this example, suppose it is 192.168.1.1. In simple LAN arrangements, this
would be the main “router” between your office network and the open
Internet. Then the following iptables rules will filter packets from
hardshare instances to prevent LAN destinations:
sudo iptables -I FORWARD -s 172.17.0.0/16 -d 192.168.0.0/16 -j DROP
sudo iptables -I FORWARD -s 172.17.0.0/16 -d 192.168.1.1/32 -j ACCEPT
8.5. Termination scripts
You have the choice of executing a script at the end of every instance. Intuitively, this script provides automatic clean-up of a workspace to prepare it for the next user. For ESP32 boards, we can
pio run -t erase
to erase flash memory. Put this in a shell script that hardshare can call:
#!/bin/bash

source ~/.platformio/penv/bin/activate
pio run -t erase
where we include the sourcing of a Python environment, which is required in some installations of PlatformIO. Finally, add the script path to your hardshare configuration; for example,
hardshare config --add-terminate-prog /home/scott/hs/terminate.sh
8.6. Stream video
For most users, streaming video is most easily achieved with the command
attach-camera as described in the section: Attach External Camera. After
following those instructions, typically it suffices to:
hardshare attach-camera -d 0
to enable video streaming. Note that the camera is only active when there is an active instance with your hardshare client. Thus, the above command can succeed without you noticing any activity on your camera.
8.7. Make a sandbox
Go to https://rerobots.net/hardshare and, in the Devices section, find the
id corresponding to the workspace deployment listed in your local configuration by
hardshare config -l
In the Sandboxes section, push “create new”. The form has the following parts:
a summary to remind you about the sandbox; visitors to the sandbox cannot read this;
introduction text (Markdown syntax): put whatever you want here to introduce visitors to your sandbox;
sandbox kind: select
editor-xterm;example code: copy-and-paste src/hello_world_main.c from espidf-hello-world,
destination path, i.e., where we want to put code from the code editor: for this tutorial, it should be
/root/espidf-hello-world/src/hello_world_main.cbutton label: a short text to indicate what the custom button does; for this tutorial, put “build & flash”;
command associated with the button: for this tutorial, it should be
export LC_ALL=C.UTF-8 LANG=C.UTF-8 && source /root/.platformio/penv/bin/activate && cd /root/espidf-hello-world && pio run -t upload
Finally, the form has checkboxes to select which workspace deployments are
associated with the sandbox. In other words, when someone visits the sandbox,
any 1 of these devices is feasible for instantiation. The id corresponding
to your ESP32 workspace should be already be checked.