9. Tutorial: Misty
This tutorial begins where Quickstart ended. This tutorial provides typical preparation for sharing a Misty robot via hardshare:
configure a proxy to the API of your Misty,
attach a camera to the workspace,
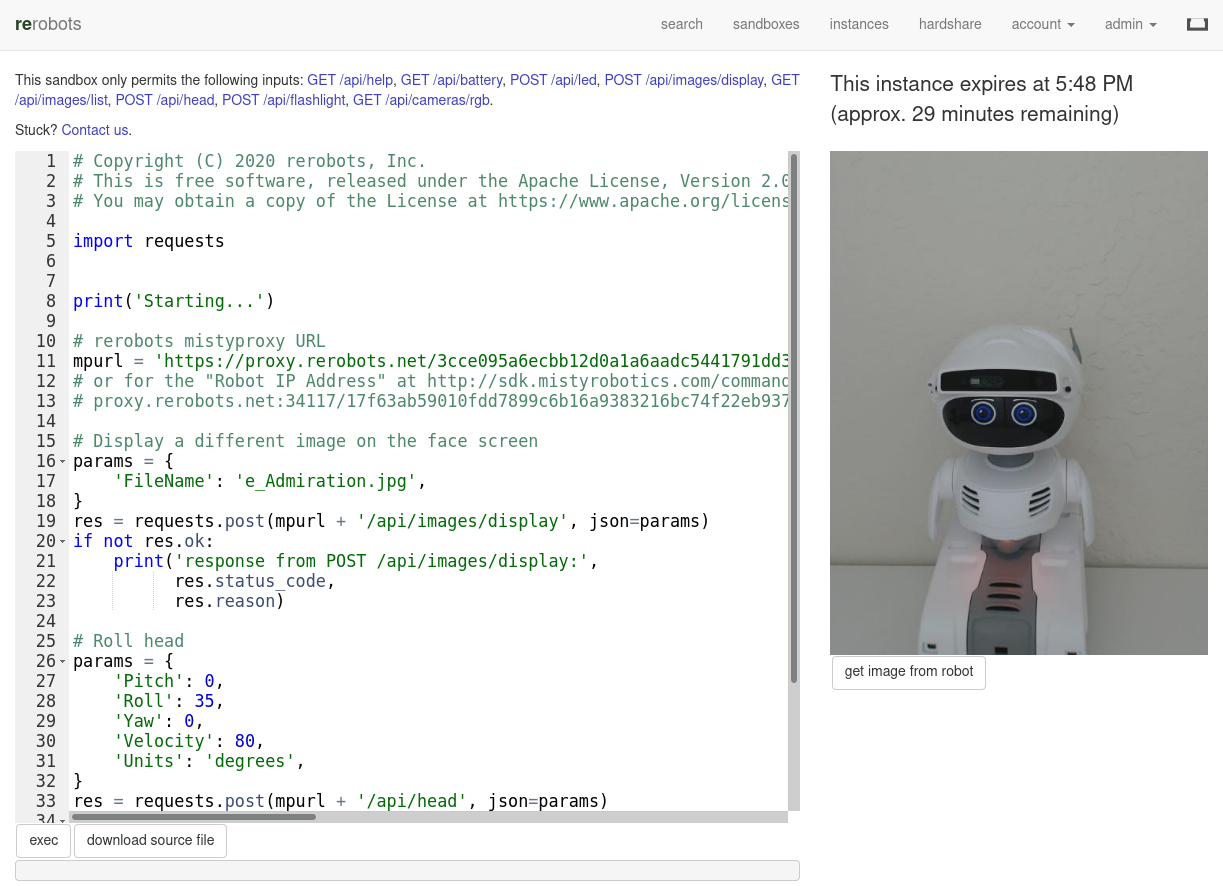
create a sandbox with example code, as shown in the figure below.
9.1. Declare the add-on mistyproxy
For example, if the Misty robot is available on the local network at IP address 192.168.0.144, then:
hardshare config-addon -a mistyproxy --ip 192.168.0.144
To change the target address, use the same command with the new address. To get the address of the Misty robot as known to hardshare,
hardshare config-addon -a mistyproxy -l
9.2. Check details via the rerobots CLI
You can check the details associated with your Misty robot deployment through the rerobots CLI. The rerobots CLI requires an API token, much like the hardshare client. To find yours locally,
hardshare config -l
and notice the path under the section “found API tokens”. Now call rerobots wdinfo
to get details associated with your workspace deployment; for example,
$ rerobots -t /home/scott/.rerobots/tokens/jwt.txt wdinfo 2d6039bc-7c83-4d46-8567-c8df4711c386
{
  "id": "2d6039bc-7c83-4d46-8567-c8df4711c386",
  "type": "user_provided",
  "type_version": 1,
  "supported_addons": [
    "cmdsh",
    "mistyproxy"
  ],
  "desc": "",
  "region": "",
  "icounter": 33,
  "created": "2020-09-18 05:25:49.711260",
  "queuelen": 0,
  "addons_config": {
    "mistyproxy": {
      "ip": "192.168.0.144"
    }
  },
  "cap": [
    {
      "id": 46,
      "date_created": "2020-10-21 22:24:07.808679",
      "user": "scott",
      "wdeployment_id": "2d6039bc-7c83-4d46-8567-c8df4711c386",
      "capability": "CAP_INSTANTIATE",
      "param": null
    }
  ]
}
9.3. Stream video
For most users, streaming video is most easily achieved with the command
attach-camera as described in the section: Attach External Camera. After
following those instructions, typically it suffices to:
hardshare attach-camera -d 0
to enable video streaming. Note that the camera is only active when there is an active instance with your hardshare client. In other words, the above command can succeed without you noticing any activity on your camera.
When done, the cam add-on appears on your workspace deployment, which
practically means that remote users will be able capture camera images or view a
live stream like that at https://rerobots.net/sandbox/fixed_misty2
9.4. Make a sandbox
At this stage, your workspace deployment with a Misty robot is ready for the kind of low-level access demonstrated in the tutorial at https://help.rerobots.net/tutorial_proxy_fixedmisty.html
To provide a faster and simpler (and also more constrained) experience for remote users of your Misty, you can make a sandbox. A similar arrangement is shown in the following video:
Go to your hardshare administrative panel at https://rerobots.net/hardshare
and in the “Sandboxes” section, do “create new”.
Select the sandbox kind misty-py.
The sandbox kind misty-py presents a code editor in which you can place
example code that is executed in an isolated, ephemeral Python environment on
rerobots servers. The code can include {{ mistyhttps }}, a template variable
that is replaced with the mistyproxy URL generated for each instance.
Other sandbox kinds are available for different language runtimes. For example,
misty-java provides a Java runtime. Alternatively, the sandbox can present a
Blockly editor if misty-blockly is selected. An example is shown in the
video at https://vimeo.com/488264658
9.5. Example misty-py template
import time

import requests


MPURL = '{{ mistyhttps }}'


def drive_fwd(mpurl, duration):
    """Drive forward for given duration (ms)
    """
    params = {
        'LinearVelocity': 15,
        'AngularVelocity': 0,
        'TimeMS': duration,
    }
    res = requests.post(mpurl + '/api/drive/time', json=params)
    if not res.ok:
        print('response from POST /api/drive/time:',
              res.status_code,
              res.reason)


# Drive forward for 2 seconds (2000 milliseconds)
drive_fwd(mpurl, 2000)
time.sleep(2)

# Change the color of the chest LED to green
# https://docs.mistyrobotics.com/misty-ii/rest-api/api-reference/#changeled
res = requests.post(MPURL + '/api/led', json={
    'red': 0,
    'green': 255,
    'blue': 0,
})
assert res.ok, 'response from POST /api/led: {} {}'.format(res.status_code, res.reason)

# Tilt the head forward
# https://docs.mistyrobotics.com/misty-ii/rest-api/api-reference/#movehead
res = requests.post(MPURL + '/api/head', json={
    'Pitch': 20,
    'Roll': 0,
    'Yaw': 0,
    'Velocity': 3,
})
assert res.ok, 'response from POST /api/head: {} {}'.format(res.status_code, res.reason)

# Sleep for 5 seconds to allow more time for human to observe results
time.sleep(5)

# Tilt the head back
# https://docs.mistyrobotics.com/misty-ii/rest-api/api-reference/#movehead
res = requests.post(MPURL + '/api/head', json={
    'Pitch': 0,
    'Roll': 0,
    'Yaw': 0,
    'Velocity': 3,
})
assert res.ok, 'response from POST /api/head: {} {}'.format(res.status_code, res.reason)

# Change the color of the chest LED to purple
# https://docs.mistyrobotics.com/misty-ii/rest-api/api-reference/#changeled
res = requests.post(MPURL + '/api/led', json={
    'red': 255,
    'green': 0,
    'blue': 255,
})
assert res.ok, 'response from POST /api/led: {} {}'.format(res.status_code, res.reason)


# Move the arms
# https://docs.mistyrobotics.com/misty-ii/rest-api/api-reference/#movearms
res = requests.post(MPURL + '/api/arms/set', json={
    'LeftArmPosition': -20,
    'RightArmPosition': -20,
    'LeftArmVelocity': 40,
    'RightArmVelocity': 40,
})
assert res.ok, 'response from POST /api/arms/set: {} {}'.format(res.status_code, res.reason)

# Sleep for 2 seconds to allow arms to complete motion
time.sleep(2)

res = requests.post(MPURL + '/api/arms/set', json={
    'LeftArmPosition': 90,
    'RightArmPosition': 90,
    'LeftArmVelocity': 40,
    'RightArmVelocity': 40,
})
assert res.ok, 'response from POST /api/arms/set: {} {}'.format(res.status_code, res.reason)
9.6. Hosting more than 1 Misty
To host more than 1 Misty robot, you must register additional workspace deployments: each ID should correspond to precisely 1 Misty:
hardshare register --permit-more
Now hardshare config -l will show a list of multiple IDs. All commands given
previously in this tutorial and in Quickstart can be used again with the
new ID by specifying it on the command-line.
For example, if the new ID returned from the hardshare register command
above is 2d6039bc-7c83-4d46-8567-c8df4711c387 and if IP address of the
second Misty robot is 192.168.1.11, then:
hardshare addon-mistyproxy --add --ip 192.168.1.11 2d6039bc
will declare the address. Notice that the above command has a prefix of the ID
2d6039bc-7c83-4d46-8567-c8df4711c387. For convenience, most hardshare
commands accept a unique prefix where a workspace deployment ID is required.